Обзор гитарного VST плагина Bias FX
Bias FX – гитарный VST плагин от Positive Grid (конкурент Guitar Rig 5 и аналогичным). В наше время достаточно популярный с приставкой ТОП . А по мнению некоторых сравним по звуку с процессором AXE FX2 (мнение субъективное, и биас фх всё-таки в проигрыше, но не будем забывать, что ценовой диапазон Axe FX 2 – 100-150 т.р.). Представлены версии для трех платформ – PC Windows , Mac OS и iOS . С осени 2018 года Bias FX стал доступен на iPhone и iPod Touch, до этого в течение многих лет он был экслклюзивом для iPad среди iOS устройств .
Итак, что же по заявлению разработчиков мы имеем:
• Непревзойденное, компонентное моделирование аналогового звучание;
• 81 высококачественных педалей эффектов с совершенно новыми алгоритмами обработки звука (еще больше педалей с помощью импорта из Bias Pedal );
• 5 ультрапрофессиональных рэковых процессоров, звучащих как высококачественный аналоговый механизм (дополняется);
• порядка 40 усилителей (импорт неограниченных моделей усилителей из BIAS AMP );
• Полная интеграция с BIAS Amp дает вам беспрецедентный контроль над созданием собственных полностью настроенных усилителей (полная кастомизация в виде замены ламп, транзисторов, уровня накала ламп, кабинета, положение и тип микрофона, снимаемого звук и пр.);
• Поддержка технологии модуляции Dual — Amp ;
• Режим Live View позволяет вам переключить пресет одним нажатием,а также и включить / выключить любой эффект или категорию эффектов;
• Детальные настройки оптимизируют выход звука BIAS FX для наилучшего звучания в любой среде (игра в линию — в микшер, усилитель — голову, комбик или кабинет), позволяя эквалайзеру выборочно отключить эмуляцию amp head , tonestack , power amp или кабинет отдельно для каждого места назначения.
• Совместимость Inter App Audio, которая позволяет подключать другие приложения Inter App Audio в цепь эффектов BIAS FX (только для iOS ).
Системные требования Bias FX (Windows и iOS):
- Windows 7 SP1, Windows 8, Windwos 10;
- 4ГБ Опертаивной памяти (минимум), рекомендуется 8ГБ;
- 1.5 ГГц 2-х ядерный процессор (минимум), рекомендуется 2.0 ГГц 2-х ядерный и более;
- 250мб свободного места на винчестере (для ОС версий 32-bit и 64-bit), рекомендуется использование SSD;
- Поддержка интерфейсом Asio4ALL технологии;
Установленная версия iOS 8.0 и выше.
От модели айпада (и его железа соответственно) будет зависеть комфорт и возможность построения более сложных цепей эффектов. Bias FX будет работать даже на древнем iPad 2, другой вопрос как он это будет делать. Лично я использую iPad 4, и пришло время его сменить (поддержка закончилась, да и использование на последних версиях ОС далеко от комфортного). На данный момент в 2018 году я бы рекомендовал брать минимум iPad Air (если нужно, что-то более дешёвое с результатом здесь и сейчас). С приорететом на будущее среди бюджетных (да-да, сейчас это бюджетные планшеты) отлично подойдут iPad Air 2 и iPad 2017, их хватит с головой не на один год.
Наиболее важным отличием между iOS и «стационарными» версиями является режим работы (набор эффектов и усилителей одинаковый). Bias FX на iPad работает в режиме 24 бита 44,1 кГц, когда как его братья на ПК и Mac, благодаря Asio4ALL, работают с частотой дискретизации повыше – 24 бита и вплоть до 192 кГц.
Поэтому сегодня попробуем разобраться, сильная ли разница между версиями на разных платформах, а именно iOS и Windows . Пресеты и настройки плагина абсолютно идентичны, в обоих случаях для записи использовался iRig HD 2 от IK Multimedia . Разница в том, что версия VST плагина на Windows записывалась в режиме 24 бита/96 кГц с помощью Cockos Reaper , тогда как iPad версия в 16 бит / 44,1 кГц с помощью GarageBand (поддержку записи в режиме 24 бита гараж бэнд получил только в iOS 11, в моем пользовании находится iPad 4 для которого потолок iOS 10.3.3, поэтому в данном случае я остался «за бортом»). Но, так или иначе, если погружаться в мастеринг, то 24 лучше, в более нетривиальных задачах никакого слышимого преимущества между 16 и 24 нет. А тот, кто говорит, что есть, наверняка заблуждается 🙂
Что же из этого получилось, смотрим на видео внизу. На мой взгляд, версия для айпада показала себя ничуть не хуже своего «стационараного собрата». Методы и алгоритмы обработки те же, возможности одинаковые (за исколючением создания импульсов, на iOS устройствах их можно только использовать), а услышать разницу между 44,1 — 96 кГц и выше на слух нереально.
Источник
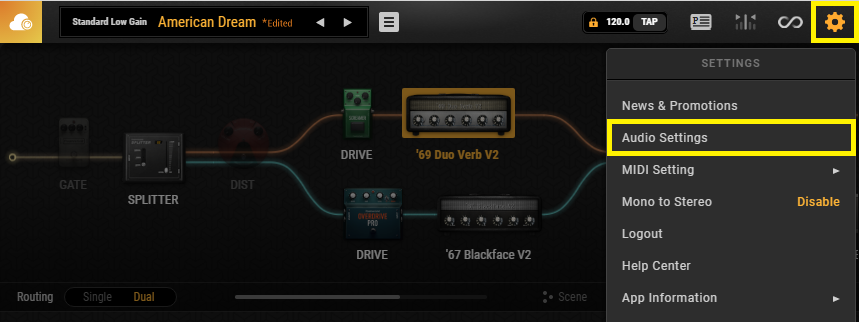
BIAS FX 2 Audio Settings (PC)
June 02, 2021 10:30 Created at: September 29, 2017 04:23 //—>
You can find the Audio Settings via Settings->Audio Settings in BIAS FX Standalone (BIAS FX plugins will follow the settings of DAWs)
Output Section
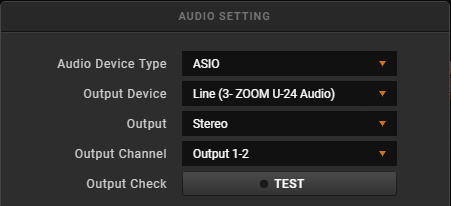
— Audio Device Type
Select the Audio Device Type for your Audio Interface, ASIO is recommended in most of the cases for the minimum latency
Select your audio interface as your Output Device
Choose «Stereo» or «Mono» output
Choose the corresponding output(s) (on your audio interface) connected to your studio monitors/speakers or headphones
Input Section

Select your audio interface as your Input Device
Choose «Stereo» or «Mono» input, if you’re using only one input for your guitar, please choose «Mono»
Choose the corresponding input(s) (on your audio interface) connected to your guitar/instrument
Sample Rate & Audio Buffer Size

Please choose the desired sample rate(supported by your audio interface)
— Audio Buffer Size
Please choose the desired buffer size, please also refer to this link to set the optimal buffer size.
*We recommend 44100 sample rate/512 buffer size as a starting point*
Active MIDI Inputs

Please select the MIDI input you want to use
Check out this walkthrough video:
Источник
Full Product Tour for BIAS FX 2
May 26, 2021 17:28 Created at: March 18, 2019 10:15 //—>
How to use this guide
In this guide, we’ll be going through a full product tour for BIAS FX 2, covering all the essential functionalities. It should help you navigate through the program with ease and better understanding.
- Signal Path Management
- Preset Management
- Guitar Match
- ToneCloud
- Window Size
- Looper
- Utilities
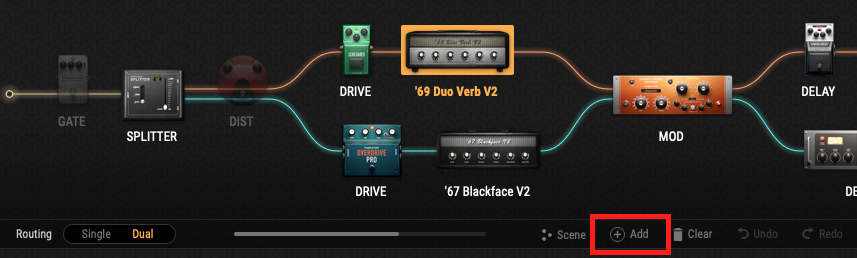
Signal Path Management
1. Add / remove effects
You can click “add” in the middle of the window to open the effects menu. Double-click on the desired effect or drag the guitar effect to anywhere on the signal path to add. Place the mouse cursor over the effect and click “x” to remove effect.
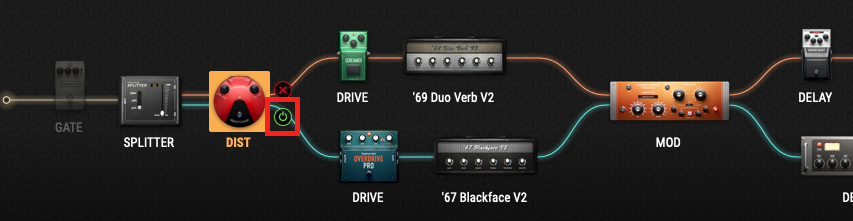
2. Replace, engage and bypass amps and effects
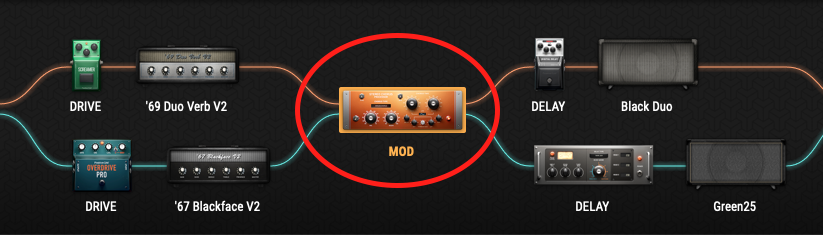
You can click the green button when the cursor is over an effect or amp to engage / bypass it , or you can click the led light on the control panel to do the same. Double-clicking any item on the signal path will open the item menu to replace the target amp or effect.
3. Drag and drop items on signal path
If you want to change the sequence of the signal path, just drag and drop any effect to the place you want. When in dual path mode, dragging the item to the middle of 2 paths lets you drop it into the “middle FX”, in case you want to run the same setting in both paths in the FX loop position.
4. Single / dual path
You can click on single / dual to set up a single or dual signal path, if you run a dual signal path routing, it will automatically add a splitter and a mixer in the front and back of the amps. You can select each path’s volume/pan/delay in the mixer, and how the signal is split in the splitter. Please notice that if you want to add delay in mixer, please pan the 2 path to L and R in case of phasing issues in your overall sound.
5. Clear / undo / redo
When you want to make a whole new preset, just click Clear and you’ll have a clean signal path with only a noise gate and an amp. You can also click undo / redo when editing signal path routing.
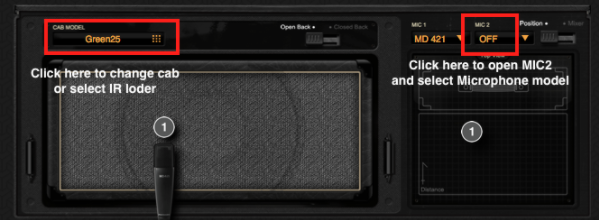
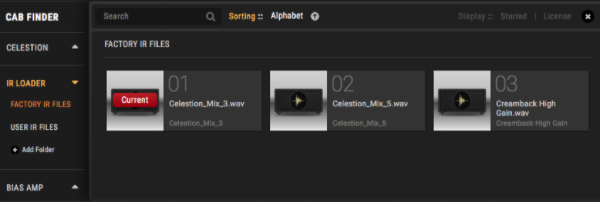
6. Cabs and IR Loader
In the Cab module, you can click the cab model bar to select different cab models or choose between Celestion cabinets or IR loaders. BIAS FX2 provide 3 Celestion official mix IR files as factory default, and you can import yours as well.
*IR Loader currently supports only .wav files in 44.1 / 48 / 88.2 / 96 kHz, 16bit / 24bit format, with maximum length of 500ms.
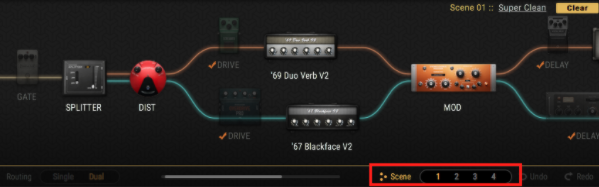
7. Scene mode
A brand new feature in BIAS FX2 which fully utilizes our pedalboard style presets is the Scene mode. When scene mode is entered, you have 4 scene slot to use: you can turn on/off the effects / amps on the signal path and save as a scene to quickly toggle and switch from different scenarios in a song. For example, you can use a clean setting in your intro, turn on a distortion pedal when going into the chorus, and turn on boost and delay for your solo. You can set them as different scenes in the same preset and switch very quickly just as if you’re using a physical pedalboard. Everything you changed in scene mode will be automatically saved.
Preset Management
1. Browsing presets
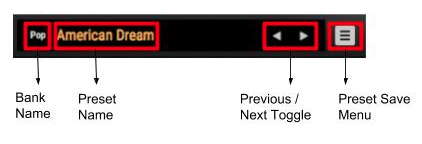
To the left of the top bar is the preset display bar. It shows the current bank name and preset name, and you can use the left and right arrow to quick browse through previous / next presets. The preset save menu gives you options to overwrite preset / save as new preset or share this preset to the ToneCloud.
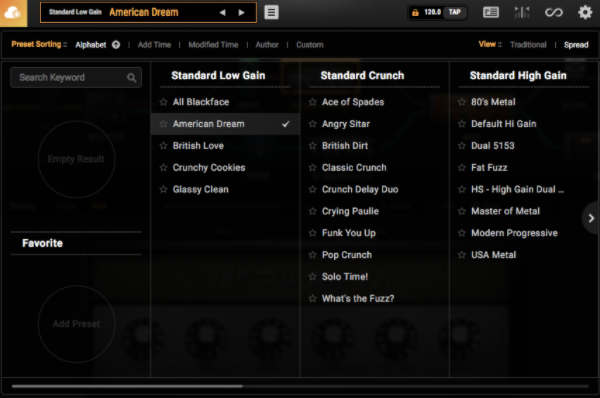
You can click the preset bar to enter preset browsing mode. In traditional view, you can view by different banks and presets, you can choose from different preset sorting methods, or search directly by name. If you click the star in front of the preset it will be stored to the favorites bank where you can find your favorite presets very easily.
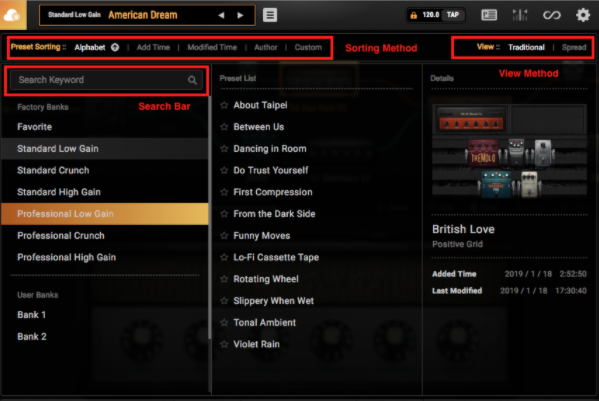
You can also use spread view to manage all banks and presets. You can simply drag and drop to copy or move presets to target bank which makes managing presets during different gigs extremely easy. You should try this now!
2. Editing Banks / Presets
When you place your mouse cursor on a bank or preset, it will display the edit and delete buttons for you to delete the bank/preset or change name of the bank/preset. Please note that you can’t delete factory banks/presets.
Guitar Match
1. Match source guitar
The entry point of the Guitar Match is to the middle left of the bottom bar. This is the first stop of the signal flow in shaping your guitar input and matching it to another guitar’s sound characters. If you want to engage this module, please remember to turn the flip switch to “ON”.
The first step is to match your instrument. Please select your body shape to create a match page (you can refer to the graphic to see which type your instrument is). Here we take an LP style guitar as an example:
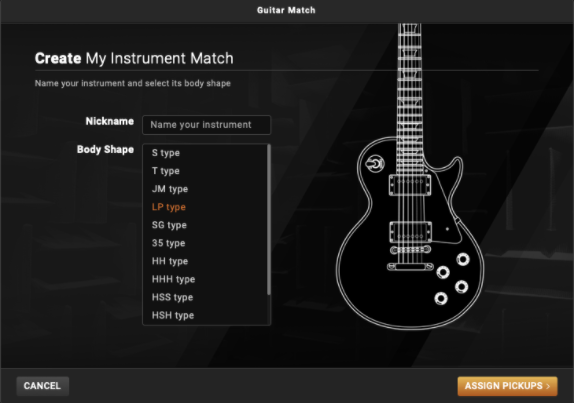
Then select the correct pickup configuration according to your instrument:
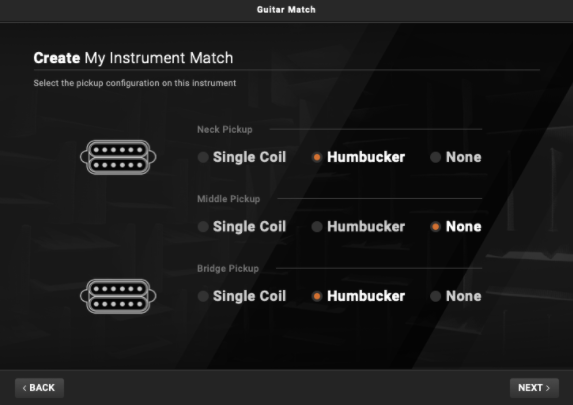
And choose a pickup position to begin the matching process.
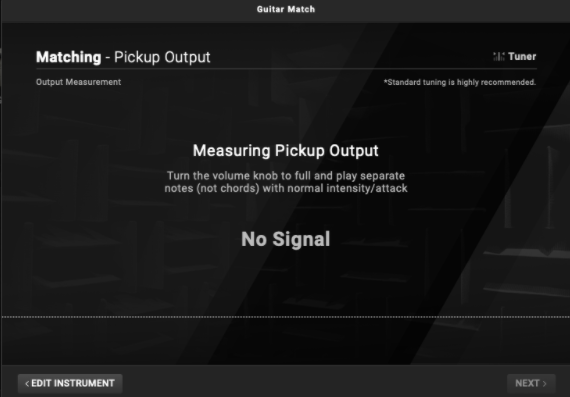
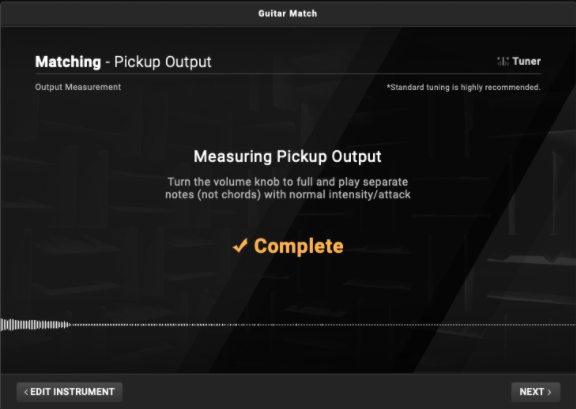
When measuring your pickup output, please turn your volume on your guitar to maximum, and play several notes using your usual single note articulation until it shows “Complete”
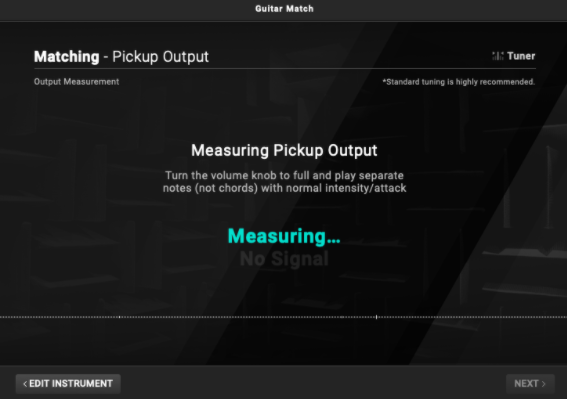
If you’re encountered with the ‘No Signal’ message, please go to the Audio Setting tab and make sure the Input is set to ‘Mono’, not ‘Stereo.
In the matching step, please follow the instructions on screen. Play an arpeggio in different positions on your guitar. If your input is successful, you’ll see the dot of each string become solid. Repeat the process from open position to the 12th fret and the matching step will be finished.
2. Select target guitar
After successfully matching your instrument, you can match another pickup position, or go to target guitar page. On this page, you can select up to 18 different boutique guitars (Elite license) to choose from, and you can adjust some details to suit your personal preferences. Please find the full list of all the target guitar specs we provide in this link: Guitar Match List.
ToneCloud
1. Download / preview / like / comment on a preset

You can click the icon to the left of the top bar to access the ToneCloud. You’ll see thousands of presets on the cloud: In each block, you can click icons for corresponding actions such as download / preview / more details / comment / like. If you would like to download a preset, please remember to log in to your ToneCloud account first.
If you only want to see the presets downloadable for your FX2 license tier, please go to the Settings (the little gear icon) on the ToneCloud and choose «Available download only»

When in preview mode, you can temporarily play through the selected preset to see if you like the sound of it.
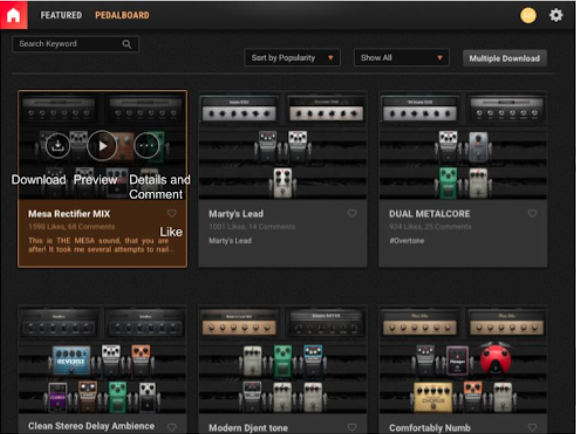
2. Search / sort / multiple download
On the top left is the search bar, where you can search by preset title / description, and sort all the presets by upload time or popularity. In BIAS FX2, you are also able to download multiple presets at once: just click the “multiple download” button on the top right and select all the presets you want to download.
Window Size
You can choose between different window sizes in BIAS FX2 by selecting “Window Size” in the settings menu (Mac and Windows operating systems will behave a little differently from each other).
1. Mac
On the Mac, you can choose between “Standard” mode or “Responsive” mode. In “Responsive” mode, the software automatically adjusts the window size to 80 percent of your screen size. However, be aware that on some displays this proportion will reduce your window to smaller than “Standard” mode, so please choose according to your device’s display.
2. Windows
In Windows, you can choose between 1.25x or 1.75x larger than standard window size:
Looper
Click the top right icon to open the Looper menu.

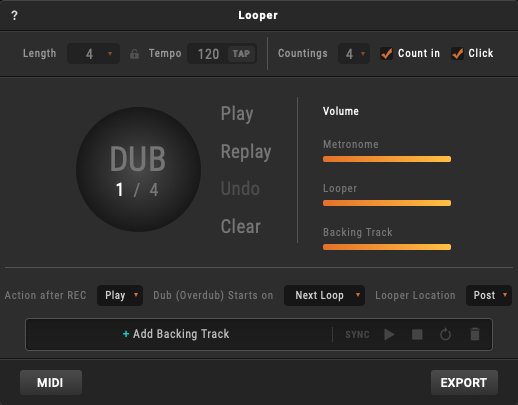
1. The top left of the Looper menu is where you can select the total length and tempo of your recording. You can select up to 16 bars of recording length or set it to free (which will record until you manually stop it). For tempo you can directly input the BPM or tap out the tempo you want, and clicking the lock icon will lock the speed at the global setting for the plugin/standalone.
2. On the top right is the metronome setting for the Looper. You can set up the count of each bar, the count-in to the recording, and the sound of the click during recording.
3. On the middle left is the Looper recording/playing/dubbing control panel. You can click the circle to start recording your first loop, and after recording the first loop, you can play along with it or click the circle to dub another loop on top of it. Undo clears your last loop, while Clear clears the whole recording.
4. On the middle right is the volume adjustment of the metronome(click) and the Looper.
5. On the bottom you can choose your action after recording and when to record your dub (right away or when the next loop starts). If you select looper location to the “pre” position, this looper will become a reamp machine: it will loop your last recording and you can dial in your tone in the signal path without playing your guitar.
6. Export button allows you to export current recording to a 24-bit, 48kHz wave file.
Utilities
1. Tuner
You can click the icon on top right to open the Tuner window.

The default setting of Tuner is muted (click to unmute). The Tuner range can be set between 430Hz and 445Hz (default value is440Hz).
2. BPM
BPM is on the middle of the top bar. You can directly input the BPM or tap out the tempo you want. Clicking the lock icon will lock the speed at the global setting of your DAW (this doesn’t affect anything in the Standalone version).
3. Quick Snap
Quick Snap is on the middle of the bottom bar. This feature allows you to quickly compare different signal path settings to determine the perfect tone for you.
To save a snapshot from a signal path, press and hold on the desired number of quick snaps (about 1 second) until it shows “Quick snap captured”, and you can click back and forth on the numbers to compare them. If you feel a particular quick snap is tonally the best fit for you, just click “Apply” on the top right to apply this signal path setting to this preset.
4. Output Setting
*We recommend you leave the Output Setting turned to OFF unless you know what you’re doing.
The entry point of the output setting is on the middle right of the bottom bar. This is almost the last stop of the signal flow (just right before the output volume) where you can shape your overall EQ and control the amp module according to different environments / purposes. If you want to engage this module, please remember to turn the flip switch to “ON”.

We have 4 default settings for different connections and scenarios. You can turn on/off any module and adjust EQ compensation, and any edits will be saved immediately.
— Direct Out: If you’re using an audio interface + studio monitors/headphones
— Stack Poweramp & Combo Poweramp: If you want to send the output from your audio interface to the effect return on a guitar amp
— Amp Front: If you want to send the output from your audio interface to the input on a guitar amp.
Источник