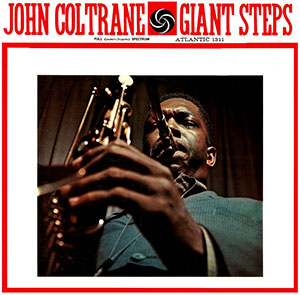
- Giant Steps
- Giant Steps – Chord Melody
- Giant Steps Melody 1
- Giant Steps Melody 2
- Giant Steps – Improvisation
- Triad Outlines
- Four-Note Arpeggio Outlines
- 1235 Outline
- Giant Steps Licks
- Giant Steps Chords & Comping
- 3rds and 7ths
- Giant Steps — Chord Melody, Single-Note Solo & Chord Shapes
- Composed by John Coltrane
- Tune’s History
- The Nuts and Bolts
- Giant Steps: Comping Ideas
- Giant Steps: Chord Melody
- Giant Steps: Single-Note Solo
- Giant Steps: Backing Track
- Giant Steps: Chord Reference Sheet
- Suggested Listening
Giant Steps
There are few tunes in the jazz repertoire that strike fear in the heart of players such as the John Coltrane tune “Giant Steps,” which can be a challenge from both a soloing and comping perspective. When guitarists first begin to explore John Coltrane’s Giant Steps changes, this series of chords can seem like an impossible mountain to climb, but that doesn’t have to be the case.
While Giant Steps may seem like a huge task to tackle in the woodshed, the chords, chord melody arrangements and solo studies in this lesson will get you on your way to sounding hip over this tough chord progression.
THE JAZZ GUITAR CHORD DICTIONARY (FREE eBOOK)
Download now and learn 244 chord shapes!
Giant Steps – Chord Melody
Giant Steps Melody 1
In this first chord melody example, you are using 3rd and 7th voicings with the melody note added on top.
Giant Steps Melody 2
Now you will use four-note chords based on the 3rds and 7ths in order to expand upon the three-note chords you learned in the first chord melody sample.
Giant Steps – Improvisation
Rather than focus on big, two-octave scales and arpeggios right from the get-go (which can make soloing over this tune difficult), you can instead start your study of Giant Steps by using triads, one-octave arpeggios, and the 1235 outline to get your ears and fingers around these changes.
This section will break down those three approaches, providing four practice variations for each along the way, as well as give you examples of how to turn these technical approaches into licks over the first 8 bars of Giant Steps, which is also called the Coltrane Matrix.
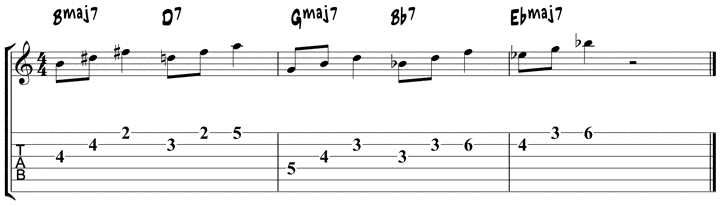
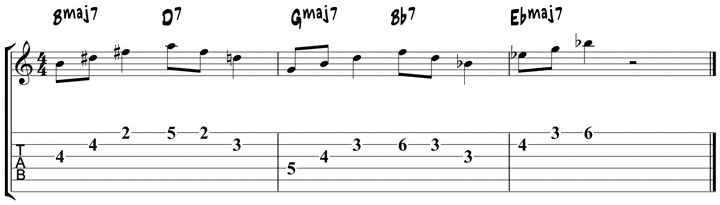
Triad Outlines
The first motive that we’ll use to outline the Coltrane matrix is the root based triad: 1-3-5
For the purposes of this example, each triad is written with the same rhythm (two eighth notes and a quarter note). Once we have the triads under your fingers feel free to alter the rhythms for any or all of the chords and actually make some music.
Triads are often overlooked in a traditional jazz context, but they can be a great tool when navigating tough chord changes, such as those found within Giant Steps.
Here are the 1-3-5 triads for the first four bars in ascending fashion.
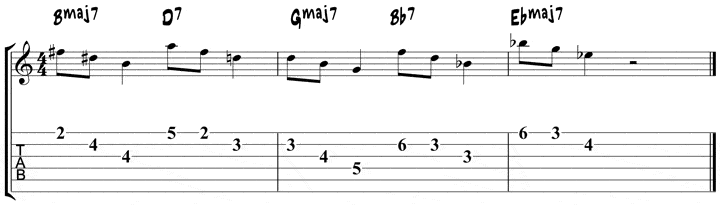
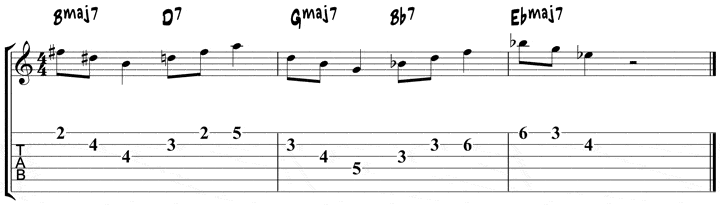
In the next example, the triads from example 1 are now presented in reverse order: 5-3-1.
Though it may be tricky to get used to beginning a triad from the top down, this is a great way to bring triads into your lines without sounding like you are simply running up the chords.
Now that you have the ascending and descending triads under your fingers, you can start to alternate between the two.
In this example, you will ascend the first triad then descend the second triad.
Notice how the first note of the second triad (A), completes a B7 chord when added to the first chord. The same thing occurs with the first note of the fourth chord (F on the Bb7), which produces a G7 chord.
Though these connections are not necessarily important to the harmony of the tune, they may help when you are working on finding fingerings for these exercises.
The next exercise is the reverse of example 3, where the first triad is descending and the second triad is ascending.
Now the first note of the third chord (D), is the root of the previous chord and completes a one-octave 1-3-5-8 triad.
The same thing occurs between the fourth and fifth chords where the Bb on the downbeat of bar three completes a Bb triad, 1-3-5-8, from the Bb7 chord in the previous bar.
Four-Note Arpeggio Outlines
Now that you have worked out the triads for each of the chords in the Coltrane matrix, you can move on to the four-note arpeggios for each chord.
For the purposes of this article, each arpeggio is presented in only one position on the neck. After this position becomes comfortable, feel free to play these arpeggios on different string sets and positions on the fretboard.
As with the first motive, feel free to alter the rhythms of each arpeggio once you have basic eighth notes under your fingers. One way to do this would be to play a triplet on beat one and a quarter note on beat two or vice versa.
The first example presents the four-note arpeggios for each chord in ascending order.
This example presents the 1-3-5-7 arpeggios in descending order
Now you can begin to alternate between ascending and descending arpeggios.
This example is only one possible fingering, feel free to explore other fingerings to open up these ideas to different positions on the neck.
The following example is a reverse of the previous outline, where the arpeggios are now alternating between descending and ascending fingerings.
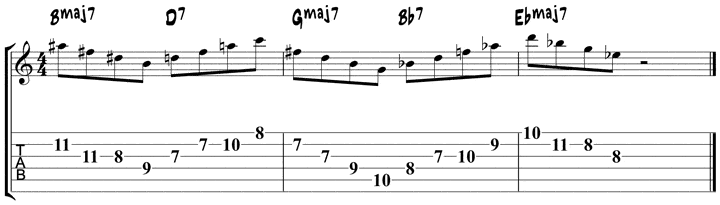
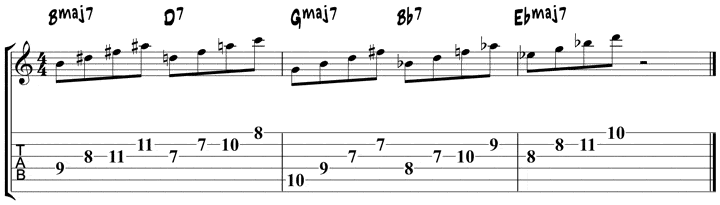
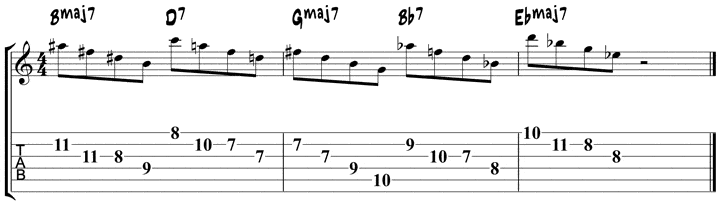
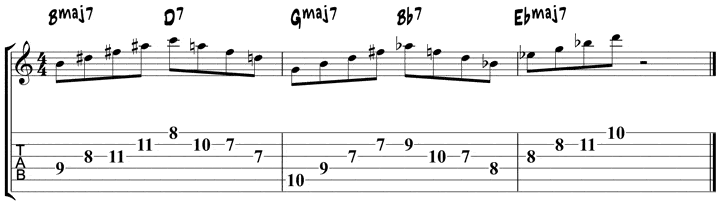
1235 Outline
In the next four examples, you will look at one of John Coltrane’s favorite motives: 1-2-3-5
This motive has become an essential part of the improvisational repertoire for many famous jazz musicians, including Bill Evans, McCoy Tyner, Jerry Bergonzi, and Miles Davis to name a few.
In order to make this as simple as possible, it is important to think of each root as 1. Then you just play 1-2-3-5 over each of the chords. This is easier than thinking of this motive within the different keys, which would mean thinking about the D7 motive as 5-6-7-9 in the key of G for example.
The first example presents the 1235 motive in ascending order over each chord in the progression.
This example presents the previous exercise in reverse order: 5-3-2-1.
Getting used to playing this motive backward can be a bit tricky, as the fingerings start to get a bit awkward depending on what string set we use.
Though it may be a difficult to get down this exercise can improve your technique as well as your ability to improvise over Giant Steps.
As with the previous exercises, you can now play the 1-2-3-5 motive alternating between the ascending and descending versions.
There is now a bit of a jump between the second and third chord and the fourth and fifth chord, as the last note of one and the first note of the next is a perfect fourth.
The fourth interval one the guitar can be played by using one finger on the same fret over two different strings. Instead of playing each note with the tips of your fingers, as we have been taught to do, try barring these two notes, which will allow for a smoother transition between each chord.
In the next exercise, you will alternate the 1-2-3-5 motive between the descending and ascending versions.
In this example, the perfect fourth interval is now ascending between the second and third and fourth and fifth chords.
Between the second and third chords, we can use the bar technique from the previous example, though because of the tuning of the second string the fourth interval is now over two frets so you can use two different fingers for these notes.
Giant Steps Licks
Now that you have worked through the three motives, you can mix them all together to create lines over the Giant Steps chord changes.
For the purposes of the exercise you are only using eighth notes. Once these licks are comfortable, you can alter the rhythms to create more interest in our melodic ideas.
Here is another example of how you can mix the three motives.
These examples are only a few ways to maneuver through Giant Steps, once you have checked them out start making up your own lines.
Start by writing out the lines away from the guitar, and then playing them to see how they sound. Once this becomes comfortable practice doing it on the spot at a slow tempo, then slowly raise the tempo until it gets closer to the original recording.
The best way to do this is to use a program like Band in the Box as it allows you to change the tempo and hear your ideas against the harmony at the same time.
Now you can take these ideas and apply them to the first eight bars, the Coltrane matrix in Eb and B.
The last example is another line written over the first eight bars of the tune using the three motives.

Now that you have these three motives under your fingers and in your ears, you can add to your repertoire by developing your own Giant Steps melodic ideas.
You can do this by taking motives from Coltrane’s solo, or any other famous recording of the tune, or by simply making up your own melodic ideas. Using these simple three and four-note motives can be an easy way to negotiate through any series of tough chord changes, not only Giant Steps but also standards like Lazybird, Moments Notice and Stablemates.
Not only does using short motives help us to navigate these tough tunes, but it can also give our solos a sense of continuity that may not be found when we rely on scales, arpeggios, and patterns.
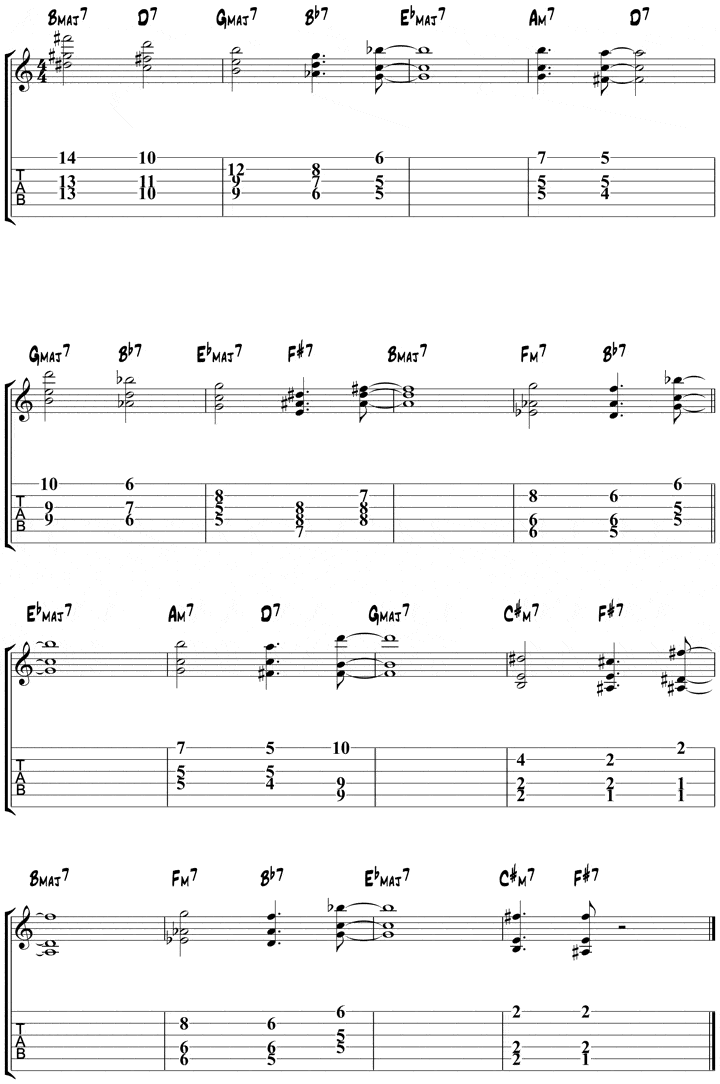
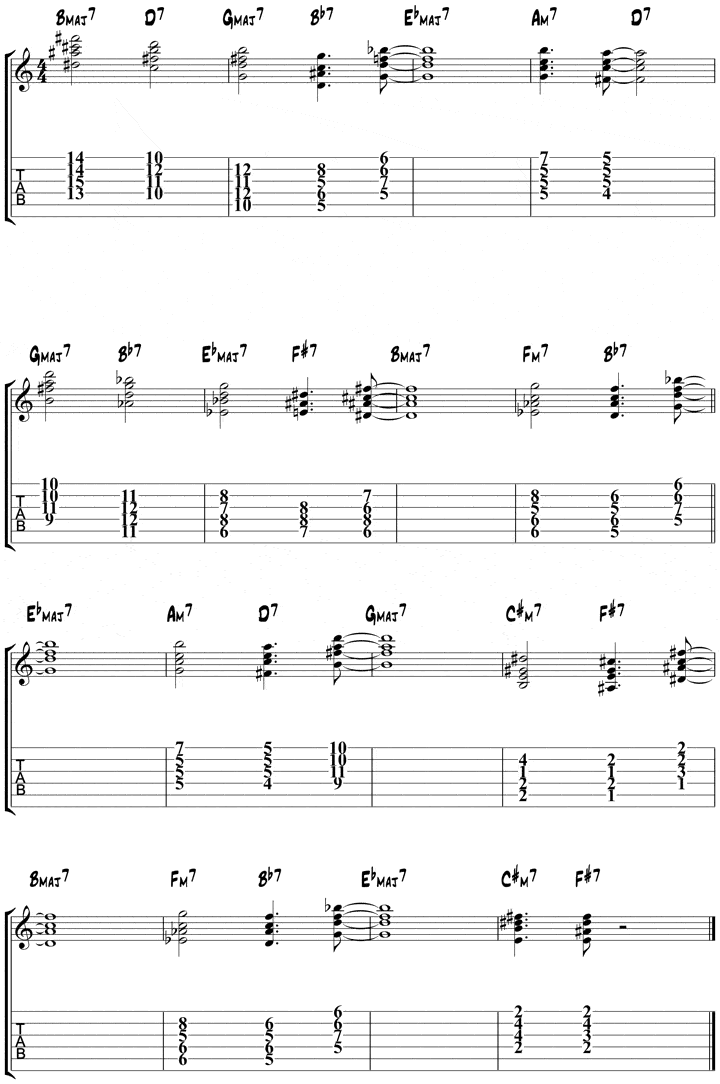
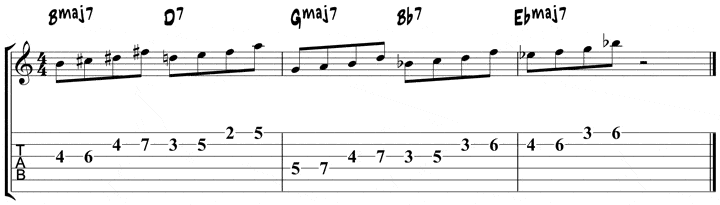
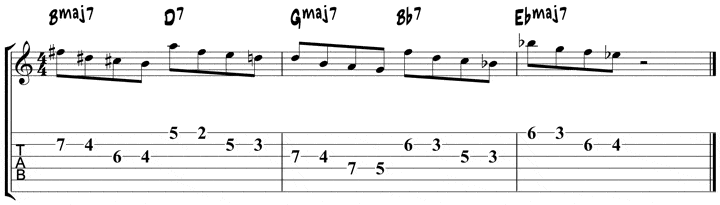
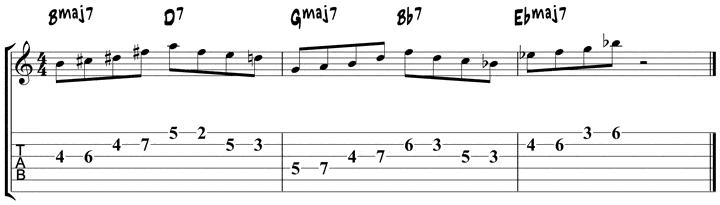
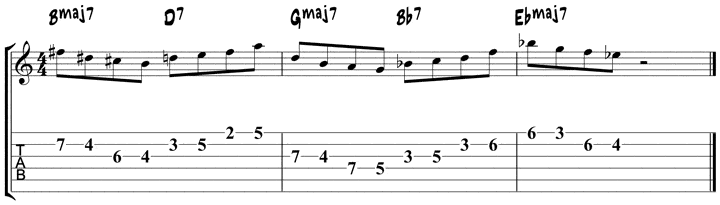
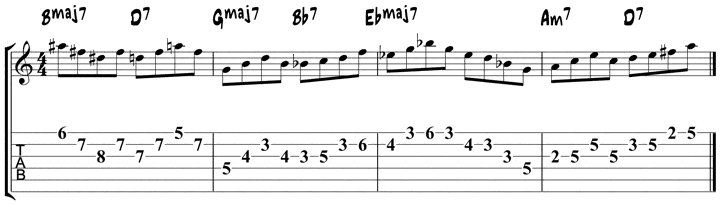
Giant Steps Chords & Comping
In this section, you will focus on learning two main ways to comp through Giant Steps, using 3rds and 7ths as well as 3 to 7 triads.
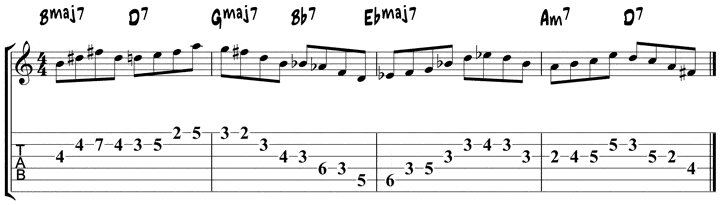
3rds and 7ths
The first harmonic idea that we will use over the Coltrane matrix is the 3rd and 7th of each chord. By using only the third and seventh of each chord, you allow yourself to move quickly through the changes while outlining the harmony at the same time.
Even though you do not have a root in these voicings, these two note chords outline the harmonic function of each chord.
- The 3rd will tell us whether the chord is major or minor.
- The 7th will tell us whether the chord is major, dominant or minor seventh.
If you have never used these voicings before try playing them without any accompaniment and hear how the changes are outlined without the root being present.
These voicings are similar to what a piano player would put in his left hand when comping through a tune. As you get used to these new voicings, you will start to add notes on top of the 3rds and 7ths that will be similar to what a pianist would put in his right hands when comping.
In this example, the 3rds and 7ths are used beginning with the 3rd as the lowest note of the first chord (Bmaj7).
Notice how the voice leading allows you to stay in one position, even though you are navigating through three different keys. Staying in one position will allow you to quickly move between each chord even at fast tempos.
As you’ve probably already noticed, there is no 7th in the first chord voicing (Bmaj7). In order to avoid a perfect fifth interval, which tends to sound out of place in certain situations, you are using a major 6th chord instead.
The 6th is a common substitute for the 7th in a major seventh chord, and it allows you to use a perfect fourth interval instead of a perfect fifth.
Источник
Giant Steps — Chord Melody, Single-Note Solo & Chord Shapes
Composed by John Coltrane

Tune’s History
Giant Steps is a Coltrane tune which also happens to be the name of the album on which it is included. It was recorded in 1960 and this tune is often regarded as a benchmark for improvising musicians.

The «Coltrane Changes» as they are known, are the foundation for several of Coltrane’s tunes such as Countdown and 26-2. More on that in a second. Players often like to reharmonize other tunes using these changes. You can really get crazy with it!
This is one of the more challenging — if not the most — in our list of standards so please take your time with this one.
The Nuts and Bolts
Giant Steps cycles through three different key centers separated by major 3rds. Altogether the roots of these chords make up an augmented triad. It’s really quite a neat device, and once you get the hang of it, is quite fun to explore.

In its original key, the three key centers are B major, Eb major, and G major. Some teachers will have you play around in each key center modally and that is perfectly valid, but getting all of the changes including the ii V progressions leading up to each key is important.
Make sure you can make it sound musical and make each change come out, so to speak.
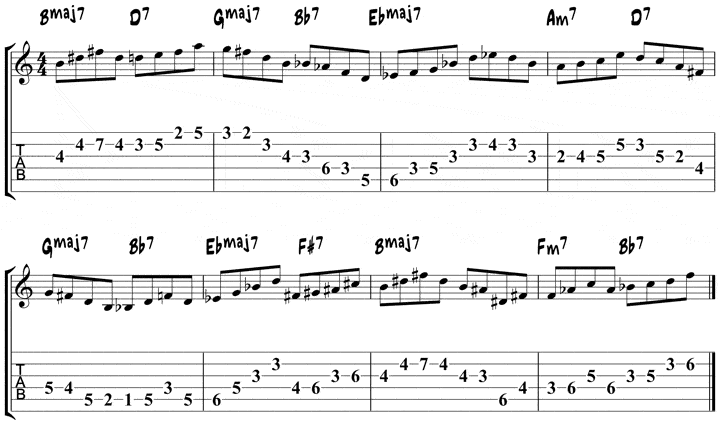
Giant Steps: Comping Ideas
Here are some basic chord voicings to get you started on comping for Giant Steps. Be sure to take your time with this as this tune is a lot to handle both, harmonically and improvisationally!

Giant Steps: Chord Melody
In this chord melody, we are simply taking you through all of the chords with the melody notes on top. I made it a point to not focus on ties or syncopations and just give you an idea of how you can voice this so the melody notes are on top.
Giant Steps: Single-Note Solo
As we mentioned previously, this tune is widely regarded as a benchmark of sorts for improvisers and aspiring musicians. Make sure you take your time and absorb some of the licks here.
We are mostly making use of standard ii-V licks and a few outside ideas while trying to hit the changes.
Giant Steps: Backing Track
Here’s a nice little backing track for you to practice some of the material covered here!
Giant Steps: Chord Reference Sheet
We are also giving an in-depth chord reference sheet so you are able to comp over Giant Steps more effectively.
Suggested Listening
-John Coltrane’s Giant Steps album released in 1960. This is where the tune was first premiered and ‘Trane does not take his time getting right to it. Tough changes at blistering speed!

-Michel Camilo’s Spirit of the Moment album released in 2007. This one is a bit of a frantic version that actually starts with a really quirky backbeat. Definitely worth checking out!

-Pat Metheny’s Trio Live album released in 2000. In this version, Pat takes the tune a bit slower with a straight 8th type feel.

-Vital Tech Tones’ Vital Tech Tones album released in 1998. Scott Henderson, Victor Wooten, and Steve Smith. Does it get any better?

-1.png?width=150&height=148&name=unnamed%20(1)-1.png) Marc-Andre Seguin is the webmaster, mastermind and teacher on JazzGuitarLessons.net, the #1 online resource for learning how to play jazz guitar. He draws from his experience both as a professional jazz guitarist and professional jazz teacher to help thousands of people from all around the world learn the craft of jazz guitar.
Marc-Andre Seguin is the webmaster, mastermind and teacher on JazzGuitarLessons.net, the #1 online resource for learning how to play jazz guitar. He draws from his experience both as a professional jazz guitarist and professional jazz teacher to help thousands of people from all around the world learn the craft of jazz guitar.
Источник