- Музыкальные инструменты в Расте
- LoopMIDI и MIDI Player – игра на музыкальных инструментах в Rust
- Настройка программы LoopMIDI
- Настройка программы MIDI Player
- Где найти музыку?
- Настройка Rust’а
- Rust — Songs on Guitar
- Rust Songs on Guitar
- Midi для гитары раст
- Rust Wiki
- Introduction
- MIDI Hardware vs Software
- Getting Started
- Enable MIDI Convars
- Debug Mode
- Convar Setup
- Key Press Binds
- NOTE ON
- NOTE OFF
- Knob and Slider Binds
- Additional Commands
- Print Binds
- Clear Binds
- MIDI Software Setup
- Virtual MIDI Port
- Software Examples
- Elgato Stream Deck
- Mobile/Tablet Apps
- Who can use MIDI binds?
- Will my MIDI hardware/device work with Rust?
- My MIDI binds aren’t working!
- What controller is being used in the video at the top of the page?
Музыкальные инструменты в Расте
Музыка в современном мире играет не самую последнюю роль. Думаю, никто не будет спорить с тем, что любые дела гораздо интереснее делать под какую-нибудь музыку. Да чего греха таить, даже данную статью я печатаю с поставленной на repeat музыкой.
Не так уж и давно в игру Rust ввели первое платное DLC – Rust Instruments, цена которого на данный момент составляет 259 рублей. Буду с вами предельно честен – реально интересных инструментов во всём DLC практически нет. Из всего списка инструментов я использую только фортепиано.
Моей самой первой мыслью после покупки DLC было «Это мне что, теперь Midi-клавиатуру докупать надо? А софтины никакой нет, чтобы всё само игралось, как на гитаре раньше?». И ведь действительно есть специальный софт, вернее 2 программы, при помощи которых можно играть на музыкальных инструментах в Rust.
LoopMIDI и MIDI Player – игра на музыкальных инструментах в Rust
Для игры на музыкальных инструментах в Rust нам понадобятся 2 программы – LoopMIDI и MIDI Player. Ссылки на их установку вы можете найти ниже:
С установкой программ проблем возникнуть не должно, так что не буду расписывать данный процесс. Приступим к настройкам.
Настройка программы LoopMIDI
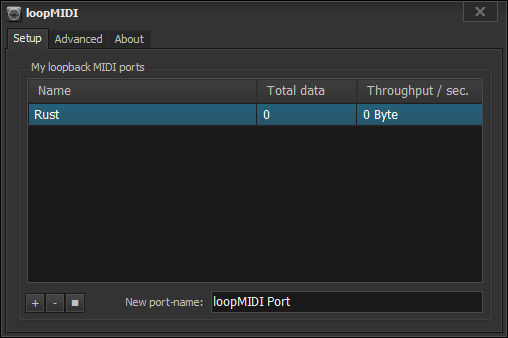
Первым делом открываем программу LoopMIDI. Нас встретит абсолютно пустой интерфейс.
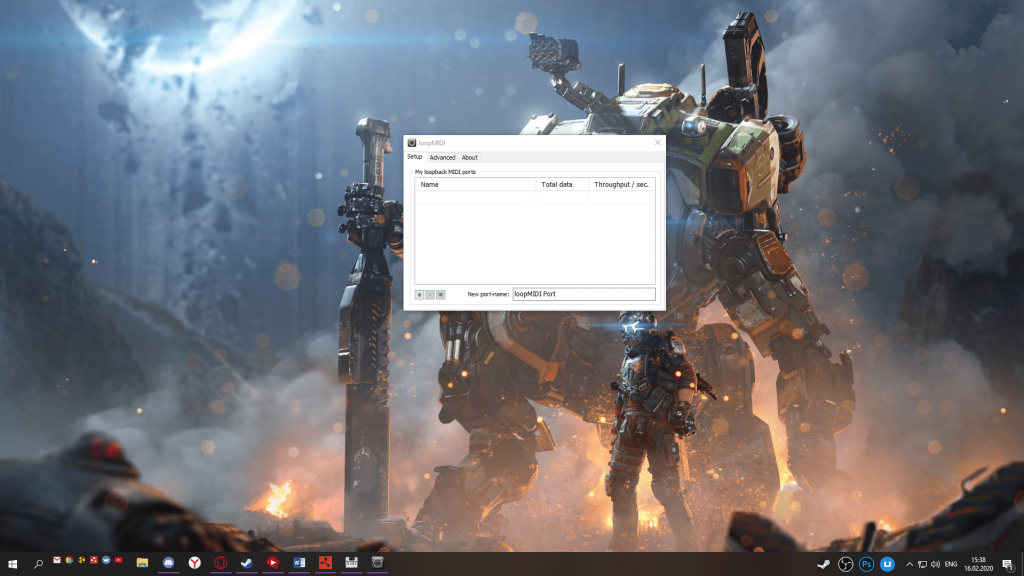 Пустой интерфейс программы LoopMIDI
Внизу есть надпись «New port-name», а правее рамка с текстом «LoopMIDI Port». Стираем эту надпись, заменяем её на «Rust». После этого в левом нижнем углу программы находим «+», а затем нажимаем на него левой кнопкой мыши.
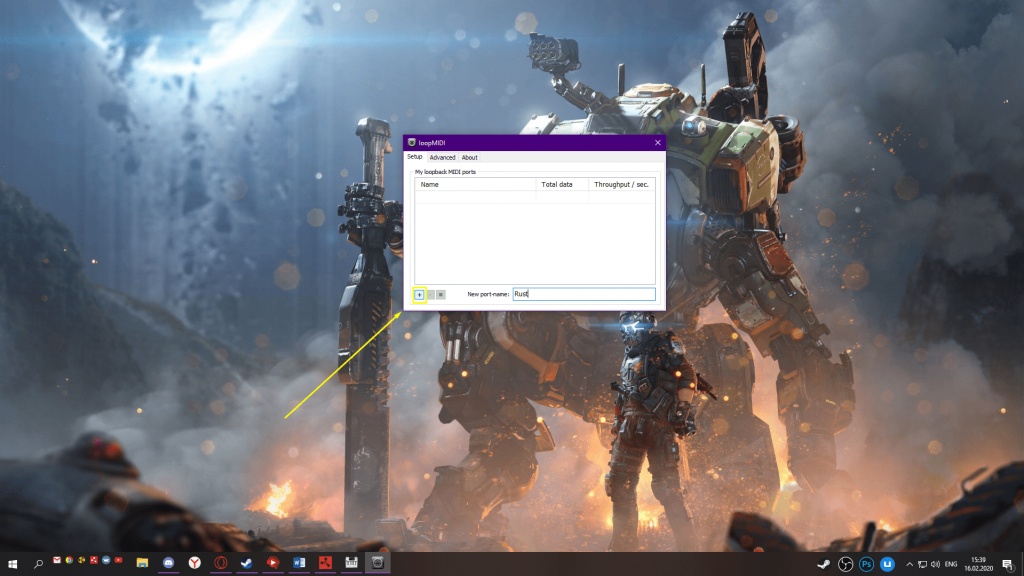 Настройка LoopMIDI под игру Rust
После этого программа обретёт следующий вид:
 Настроенная под игру Rust программа LoopMIDI
С настройкой данной программы закончили, можем её закрывать. Но она обязательно должна находиться в системном трее. То есть программа условно закрыта, но при этом она всё ещё работает.
Настройка программы MIDI Player
При открытии программы MIDI Player нас опять же нас встречает полностью пустой интерфейс.
 Пустая программа Midi Player
Много действий от вас не потребуется. В верхнем левом углу находится шестерёнка. Нажав на неё, вы откроете настройки программы. Ничего в настройках не трогайте, нас интересует только пункт «Output port». Активный порт заменяем на созданный ранее порт «Rust». Нажимаем кнопку «ОК», тем самым закрываем настройки.
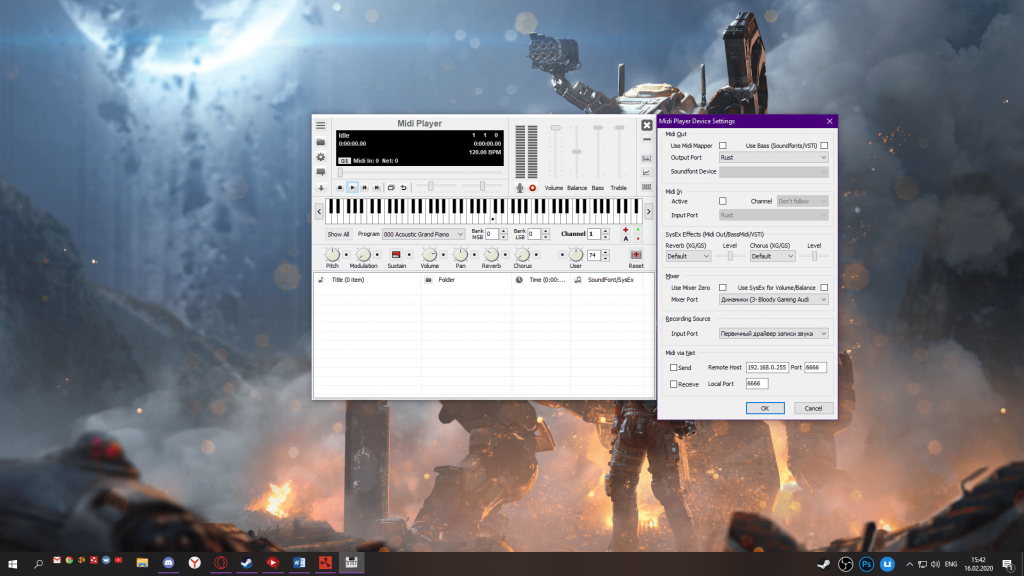 Настроенная под игру Rust программа Midi Player
С настройками закончили, теперь остаётся дело за малым – раздобыть музыку.
Где найти музыку?
Казалось бы, что сложного – просто скачай музыку и закинь в программу. Ага, если бы всё было так просто. Нам понадобится файл в формате «.MIDI». Вы можете просто найти такой файл в интернете или же сделать всё тем же способом, каким пользуюсь я.
Открываем всеми любимый сайт «Youtube.com», а там уже вбиваем в поисковике название музыки + piano. Я буду всё делать на примере музыки «Inside of every demon is a rainbow», так что я ввожу «Inside of every demon is a rainbow piano». Первым же видеороликом мне выпадает «Гайд» по игре на пианино. Вы можете прослушать музыку, и, если вас всё устраивает, открываем описание к видеоролику.
В описании нас интересует слово «MIDI file». После такого словосочетания можно найти ссылку на файл. Переходим по ссылке и скачиваем нужный нам файл в формате «.MIDI».
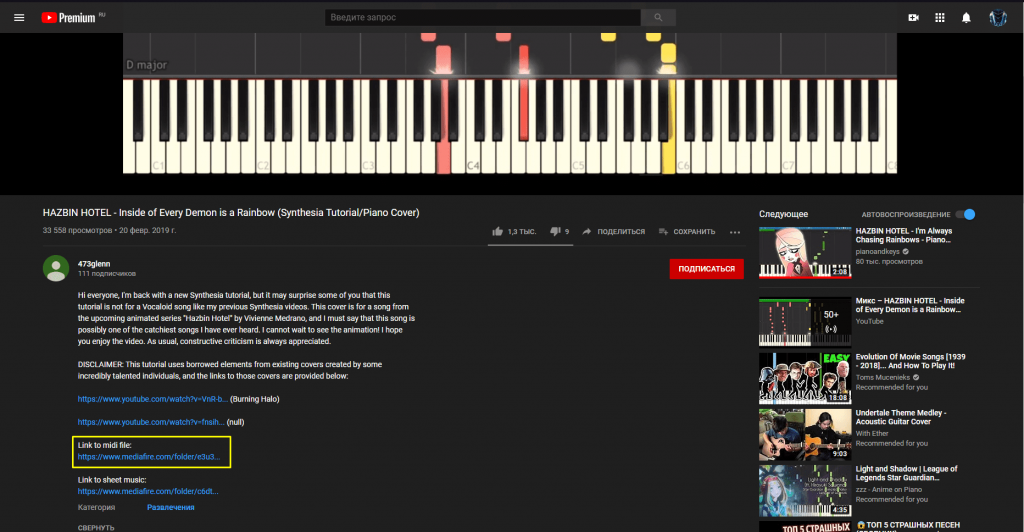 Ссылка на MIDI файл под роликом
Скачав нужный нам файл, перекидываем его в программу MIDI Player. Я перекидываю файл при помощи зажатой левой кнопки мыши, таким же способом, каким и перемещаю файлы в папки.
Как только файл оказывается в программе, не вздумайте его удалять. Лучше заранее переместите его в отдельную папку, откуда случайно удалить этот файл у вас не получится.
Настройка Rust’а
Теперь надо подготовить игру Rust к работе с программами. Открываем игру, заходим в настройки. Нам нужен раздел «Controls», где мы ищем пункт «MIDI INPUT». Убеждаемся, что напротив данного пункта красуется надпись «ON».
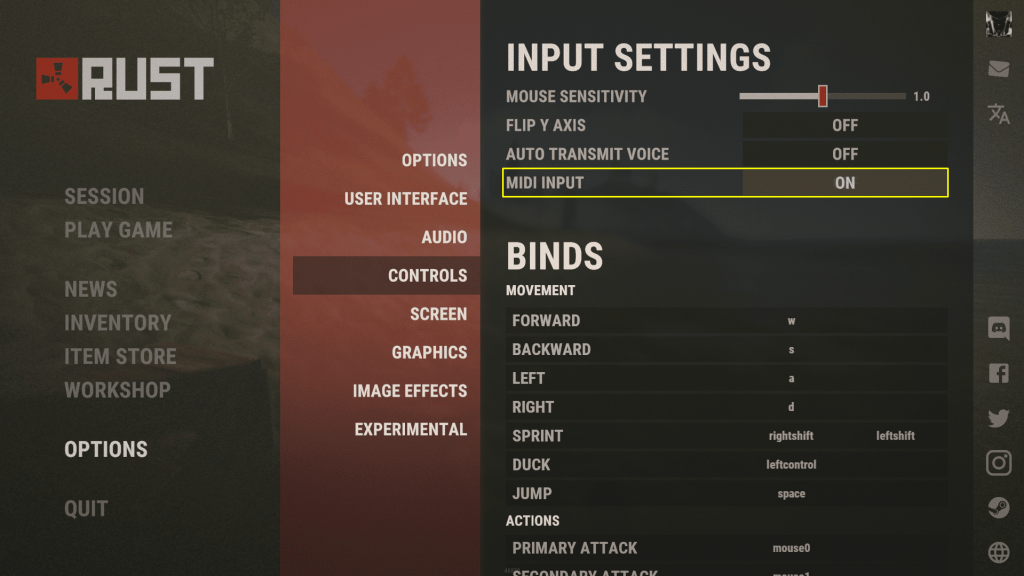 MIDI INPUT
Теперь осталось только раздобыть рояль, на котором мы и будем играть. Усаживаемся за рояль, сворачиваем игру и двойным нажатием на MIDI файл в программе MIDI Player запускаем музыку.
Скажу сразу – работает всё не лучшим образом. Какие-то фрагменты песни могут быть искажены.
Если вы встанете с рояля, ваш персонаж не будет делать какие-то непонятные движения. Программа имитирует MIDI-клавиатуру, а она вообще не влияет на движения вашего персонажа.
Источник
Rust — Songs on Guitar

For all who enjoy some small songs while being in the base or on a adventure!
Rust Songs on Guitar
Force Theme — Star Wars
36 7 8-9-8 3 3-6 7 8 3 8 6 0 9
3 52 123 52 3 59 85 4323
Lifelight (Smash Bros)
2-3-4, 2-4 8-7-6-7-5, 7 6 5, 4 5 6 5 4; 5 3 2-3-4, 2-4 8-7;6-7-9, 7 6 5, 4 5 6 5 4 5 3 6 8 9 Pause for 1 Sec 4-5-3, 234 5-6-5 4-5-3-2-1-2 4-5-3, 234 5-6-5-4-5-2, 2-3-4-5:6 4-5-3, 234 5-6-5 4-5-3-2-1-2 4-5-3, 234 5-6-5-4-5-2, 2-3-4-5 8:6 5 5 5 5, 4 3 4 1: 6 6 6 6 4 2 1 1 7 6 7 5, 5 5; 2 2 2, 7 6 5 5, 5 5 62
2 22 65 4 3 2 22 67 5 6
8 7 63 3333 6666 6564 4444 66667 8 5 5555 888 99 7 8 7 6 3
Pirates of the Carribbean
3 5 6 6 6 7 8 8 8 9 7 7 6 5 5 6 678 909 878 909 890 987 876 756 678 789 890 986 678 904 698 976
2226 5 4 22654 221 5 564 2 2
Gravity Falls Theme
2346561 2343 5654 4446654 6665654 4446654 666 888 4446654
Fortnite Default Dance
3 3 5 6 5 3 5 6 5 3 2 3 6 5 3 2 3
WII Sports Theme
1 2 4 3 2 1 5 3 4 5 8 7 8 5 3 1 2 3 2 3 4 5 8 7 8 1 2 4 3 2 5 6 9 9 1 2 4 3 2 1 5 8 9 4 0 9 8 5
Sonic the Hedgehog — Green Hill Zone
8 6 8 7 8 7 5 8 0 9 8 7 8 7 5
All Star — Smash Mouth
5 5 9 7 7 6 6 5 5 8 7 7 6 6 5 5 9 7 7 6 5 5 6 3, 5 3 5 5 5 5 3 2 5 5 5 5, 5 5 5 5 5 5 5 5 5 7 5, 7 7 9 8 7 5 6 6 6, 6 7 5 5 3 2 5 5 3 2, 7 9, 7 0, 7 9 8 7 6 6 5 6 5, 3 5 5 5 5 5 5 5,3 7 5 5 5 5 5 3 2, 7 5, 3 2 5 5, 3 2 5 5 5 7, 7 5, 3 2 5 5, 3 2 5 5 5 7, 7 9 8 7 6 6 5, 5 5 6 5 7 6, 6 5 6 7 3
At the commas, leave a little bit of time between the next set of notes.
68 668 668 6765 (Repeat)
Star Wars Theme
1 5 4-3-2 8 5 4-3-2 8 5 4-3-4-2
Beethoven — Ode To Joy
Twinkle Twinkle Little Star
1 1 5 5 6 6 5 4 4 3 3 2 2 1
2 2 9 6 6 5 4 2 4 5 1 1 9 6 6 5 4 2 4 5
777 777 79567 8888877776676 9
Boku no Hero Academia Season 2 (Sora no Uta)
1 5-5-5 554 1 5-5-5 456 11 5-5-5 454 (8-6-6-6-6 654) 11 6-5 11 5-4 3-4 3-4 3346 55443-4 11 6-5 11 5-433
Attack on Titan
2243 11 22431 64 53 42 31 64 53 42 31
Tokyo Ghoul OP (Unravel)
1 89876 9876 65 5453 333300 877788 89876 9876 65 5453 333300 877788 666-6666 098098 666-6666 — 3866 323 3866 323 3866 323 3866 323 86986 7888 80099 878753 553 5533 2233 5533 2233 553 3223343 309 09998 87875 509 998 87857 86531 887678 87875 0099 9988 87875 509 998 87857 66531 887678
Neon Genesis Evangelion
3-5-6-5-6 6-6-9-8-7-6-7 7-9-0-6-5 9-9-7-9-9-0
Take Me Home Country Roads
123 312 321 356 6553 2123 211 121
Fly Me to The Moon
8-7-6-5-4. 4-6-8-7-5-4-3 33-4. 6-5-4-3-2-3-4-6(j)-4-3-2-16
3 3 3 153 153 7 7 7 1 153 153 1 5 4-3-2 8 5 4-3-2 8 5 4-3-4-2
Источник
Midi для гитары раст


| 4,740 | уникальных посетителей |
| 48 | добавили в избранное |

Сегодня вы сможете почитав это руководство
сможете играть почти любые произведение буд то группа кино(цой) либо другую
сразу говорю Vac вы не получите
вам нужно скачать loopMIDI
Клац [www.tobias-erichsen.de]
скачать MIDI-player
Клац [download.cnet.com]
Заходим в loopMIDI
нажимаем 1 раз на плюсик он будет(loopMIDI port)
во 2 раз пишем название Rust (или что вам угодно)
Заходим в MIDI-PLAYER
закачиваем MIDI Музло на выбор
Перекидываем музыку в программу MIDI-PLAYER
Клац [midistock.ru]
Заходим в Rust
настройки-в разработке-включаем вход MIDI
ну вот и все, просто нажимаете на песню в программе и музыка будет сама играть на инструменте в расте
Источник
Rust Wiki
Introduction
MIDI binding is a set of admin-only commands which can be used to bind MIDI notes to convars in Rust.
These MIDI bind functions can also be used during demo playback for cinematic-related commands.
MIDI Hardware vs Software
The first consideration is whether you want to use a MIDI hardware setup or a software solution.
If you want to use a MIDI hardware device such as a MIDI keyboard or controller, you can simply plug the device into your machine via USB and begin setting up convars.
If instead you want to use MIDI software, for example a MIDI controller app on a smartphone/tablet or an Elgato Stream Deck, you will need to set up a virtual MIDI port on your system. Learn more by reading the MIDI software setup section of this page.
Getting Started
Before you can start binding MIDI inputs to convars, there are a few initial steps you will need to take.
Enable MIDI Convars
Use the command midiconvar.enabled 1 to enable MIDI convar reading and writing in Rust.
This setting will be saved to your user configuration and recalled on restart.
Debug Mode
To verify that Rust is listening to messages sent from your MIDI device, use the command midiconvar.debugmode 1
Once enabled, start pressing down on keys or moving knobs/sliders on the MIDI device connected to your system. The console will print out the note numbers and knob values from your MIDI device in real-time.
This command is useful for quickly identifying the note/knob number for specific keys and controls on your MIDI device, as well as the channel number for the note values. You can then use this info to setup your MIDI convar binds.
Convar Setup
There are two main MIDI functions which can be assigned to convars in Rust:
Before creating any binds, ensure you’ve enabled MIDI convars in the console first.
Key Press Binds
These are also known as note on/off MIDI behaviours — for example pressing a key on a MIDI keyboard or controller device.
Note ON functions are indicated when a MIDI key/button is pressed down.
Note OFF functions are indicated when a MIDI key/button is released.
To bind these functions in Rust, use the following commands:
NOTE ON
For example: bindkeyon 12 1 «graphics.dof 1» will bind Note 12 on Channel 1 to set Depth of Field to true.
This function means that when Note 12 is pressed on your MIDI device it will enable Depth of Field.
NOTE OFF
For example: bindkeyoff 12 1 «graphics.dof 0» will bind Note 12 on Channel 1 to set Depth of Field to false.
This function means that when Note 12 is released on your MIDI device it will disable Depth of Field.
These two ON and OFF examples together mean that Note 12 will become a ‘hold’ key — in other words, the Depth of Field effect (specified in the above convar parameter) will only be active whilst the note is being pressed down.
Knob and Slider Binds
These are MIDI behaviours which have a value range between 0 and 1 — for example moving a slider to it’s min/max.
For example: bindknob 3 1 graphics.dof_focus_dist 0 50 will bind Knob 3 on Channel 1 to set the Depth of Field focus distance to range between a minimum value of 0 and a maximum of 50.
This function means that turning (or sliding) Knob 3 on your MIDI device will adjust the focus point for the Depth of Field within the range specified.
Additional Commands
Below are some additional commands useful for MIDI convar binding.
Print Binds
midiconvar.printbindings — Prints to console a list of all the MIDI notes and knobs bound to convars.
MIDI binds are stored in the text file convarbindings.txt located in the ‘midi’ folder in your root game directory:
Clear Binds
midiconvar.clearallbindings — Removes all MIDI convar bindings.
MIDI Software Setup
Virtual MIDI Port
To use MIDI software for MIDI convar binds, you will first need to set up a virtual MIDI port on your system.
One example is to use software such as loopMIDI which creates a MIDI loopback port to send MIDI notes through via other applications. Once installed, you simply create a port with a name of your choosing (such as the example port below named «Rust») and let loopMIDI run in the background.
You can now use the custom port you’ve created to route MIDI notes from a software of your choosing into Rust.
Below are a few software examples which make use of this setup.
Software Examples
Elgato Stream Deck
The Elgato Stream Deck features a MIDI plugin which allows you to add actions such as MIDI note on/off functions to your Stream Deck device. These work perfectly with Rust’s MIDI convars and can be used either as single-press or hold types.
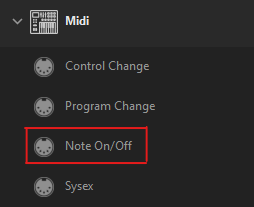
Install the plugin from the Stream Deck store by clicking the ‘More actions’ button on the bottom-right corner of the Stream Deck software, then search for ‘MIDI’. Once installed, the plugin will appear in your actions list:
Then add a «Note On/Off» function to your profile and configure as necessary. The properties for Channel and Key (aka Note) will correlate to the convar parameters used in your key binds within Rust.
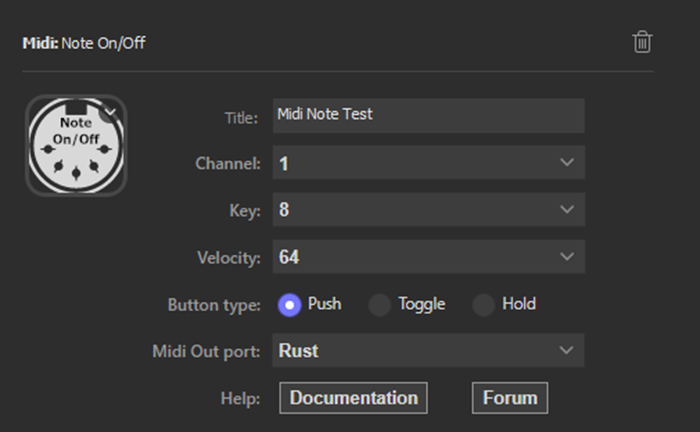
The example above is an action which sends Note 8 to Channel 1 once the button is pressed.
Make sure that the name of the virtual loopback port you’ve created in loopMIDI is selected in the ‘Midi Out port’ drop-down menu. Your custom port will only appear whilst loopMIDI is running.
Mobile/Tablet Apps
«LK» by Imaginando have a MIDI controller application for iOS and Android which can send MIDI notes to your PC over Wi-Fi. This setup also requires their desktop software called UBRIDGE to communicate between your smartphone/tablet and PC.
You need to ensure that the ‘Output’ on UBRIDGE is set to the name of the virtual loopback port you’ve created in loopMIDI.
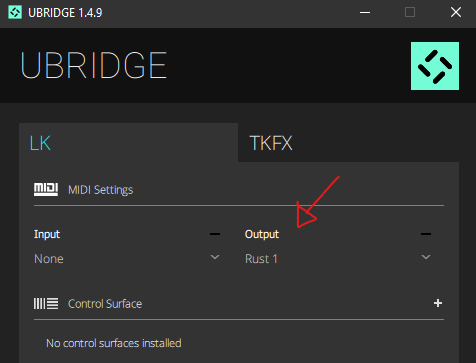
Then on the LK app, select your computer name from ‘Device’ drop-down menu at the top and you’re all set. Use the MIDI debug mode command in Rust whilst using the app’s controllers to see which note and knob numbers they correlate to.
You will then be able to achieve results like this:
Who can use MIDI binds?
MIDI convars can only be used by server admins or during demo playback.
Will my MIDI hardware/device work with Rust?
Theoretically, any MIDI device should work with MIDI convar binding in Rust.
If your hardware is not being detected, it’s likely the drivers or device itself has not been installed correctly.
My MIDI binds aren’t working!
Make sure you have enabled MIDI convars in the console.
You can also double check if your device is sending MIDI messages to Rust by using the debug mode command.
What controller is being used in the video at the top of the page?
The controller featured in this demonstration clip is a Korg nanoKONTROL 2 MIDI controller.
Источник